Everyone talks about the good electric shavers and how to use them, but only a few discuss the pain point, i.e., how to clean electric razor?
Keeping the high search query and low supply of relevant information in mind, we decided to write up an article stating all the essential points for cleaning.
Trust us, you will be able to clean your electric razor in half the time of reading this article, but only if you read it thoroughly.
But before learning how to clean your shaver, you must know the important things about cleaning the electric shavers.
So, let’s get started.
Table Of Content
Why Is It Necessary to Clean Electric Razors?
Electric razors are not daily buying stuff, so it becomes your duty to bring home a quality electric razor. Furthermore, it requires proper cleaning and maintenance to upkeep your electric shaver.
If you give less importance to a post-shaving part, then there are high chances of:
Decreasing Life of Your Electric Shaver
You heavily invest time and money in buying the best electric shaver for yourself, after which you stop maintaining that nifty tool that has always offered you a clean shave look. Isn’t it unfair?
If you properly clean your electric shaver and regularly replace blades, then don’t you think it would save hefty maintenance costs. This way, you will also get the maximum out of your electric shaving tool.
Dull Blades & Rough Shave
Another disadvantage of neglecting the importance of a cleaning routine is dull blades and rough shaves. The story does not end here. If you continue using dull blades, there are high chances of cuts, missed spots, razor burn, and pulled skin.
On the other hand, keeping the razor blades neat and clean will give you the best possible close shave. It will remove the excess oils, dirt, and debris from the blades, keeping them ready for delivering an irritation-free shave.
Now that you know why cleaning an electric razor is important: it’s time to unveil the guide on how to clean your electric razor.
How to Clean Electric Razor? (2 Ways to Clean An Electric Razor)

Like there is two importance of cleaning; there are two methods of cleaning electric razor as well:
1. Self-Cleaning Station

In the advanced technological world, the electric shaver cleaning solution cleans and lubricates your electric razor. The cleaning cartridge filled with fluid works its way around the shaving head during the cleaning procedure. It deeply cleans and removes all the build-ups formed around the blades.
Brands like Philips & Braun offer a cleaning station with their electric shavers. The cartridge that it contains needs to be replaced every quarter for a better and proper cleaning of blades. The cleaning machine will also notify the time to replace the cartridge. Each cartridge costs you somewhere around $7-8 per unit (pack of two, three, or four).
It will cost you heavily in the long run, which we’d suggest is not a good idea. Instead, you can just bring home an electric razor and do manual cleaning.
2. Manual Cleaning
A build-up on the blades like shaving cream, hair strands, and excess oil can deter the electric shaver performance. Manual cleaning will help you achieve clean and sharp blades.
We hope you turn off your electric shaver before starting manual cleaning, but still, it comes in our duty to inform you. Since it will require disassembling and water-cleaning, it is important to turn it off.
So, let’s understand how to disinfect a razor manually.

Step 1: Detach the Electric Shavers
After shaving with an electric shaver, it is time to disassemble the parts of electric razors to get rid of stray hair. You can use a brush to remove the hair. Unlike others that generalize the disassembling process for all-electric shavers, we will discuss each electric shaver separately for a clear understanding. Also, you can go through the instruction manual that the company gives with an electric shaver.
- Foil Razors
In the case of a foil razor, pop off the foil frame to unveil the blades for a thorough cleaning process. Here is an image representation so that you know how it would look after disassembling it.
- Rotary Shavers
You can snap off the rotary shaver head with the press of a release button and remove the retainer along with the blades. It will give you space to clean the nooks and crannies of your rotary shaver.
- Clipper Shaver
Some electric razors contain clipper blades, which require snapping off the head to unveil the blades inside them. Then you will need a screwdriver to unscrew the blades from an electric razor to detach them.
Step 2: Dry Brushing to Remove Hair & Skin Cells
After taking apart the electric shaver, hold the razor head over your sink or garbage bag and gently tap on it.
Here, if you are holding foils, then do not hit on the hard surface as it may damage or break the foils. And if you are using a rotary razor, then you will have two types of unit:
- Shaving head attached via a hinge to the unit.
- A friction-fitted head.
Coming back to dry brushing, you can use a small nail brush, cleaning brush, paintbrush, or toothbrush to remove all the bulk of hair and skin cells. Remember, it is only possible if you dry shave with your rotary or foil shaver.
You can even use cleaning sprays to clean your shaver, blades, and other parts. We’d advise you to buy a lubricant containing cleaning spray that kills bacteria, cleanses blades, and makes them sharp.
Note: You can consider a brush only for dry electric shavers like Remington models and other travel-friendly electric razors.
For waterproof electric razors, read the next section.
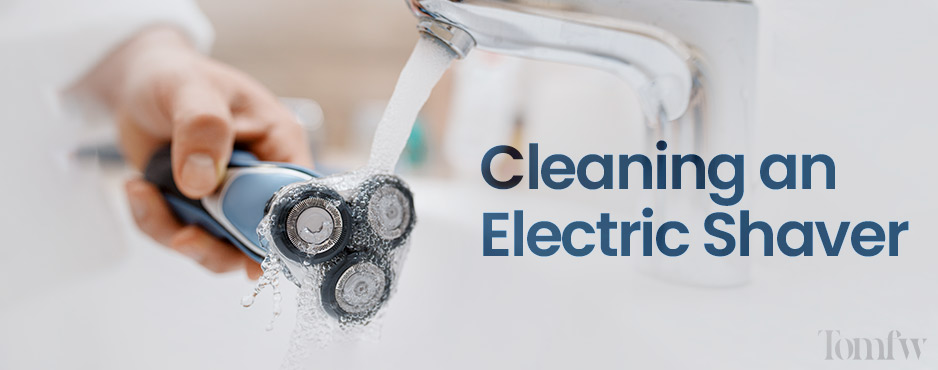
Step 3: Water & Liquid Soap Wash
In the case of a wet shave, rinsing off the shaver head under running tap water is the only option left for cleaning because, along with hair bulk, it also has shaving cream, gel, or foam buildup.
If you have successfully removed excess hair, then put all the parts together to bring the electric razor back to its original form. When the electric razor is back to its original form, pour liquid soap, hand soap, dish wash soap, or shower gel on the shaver head. After that, turn on to form lather that coat the shaving heads. Add a few drops of water to coat your shaver’s head. Allow the electric shaver to run for a few minutes and then rinse them under tap water.
For Panasonic electric shaver users, you can take advantage of the in-built Sonic Cleaning mode by long-pressing the power key. It will notify you on the LCD of the tool about the activation. Turning on will vibrate the blades at a faster rate, removing all the dirt, debris, dead skin cells and preventing water splash.
For deep cleaning, we undertook two different electric shavers from well-known companies, which you might have used, or should use for shaving.
Step 4: Deep Cleaning
Firstly, we took a Panasonic foil shaver that comes with two removable blades, and the rest of the blades are attached with foil blocks. It was easy to rinse them off as we simply placed the cutter block and blades both under the running water. In case, if you are daily cleaning, then we suggest not using a brush on foils or cutter blocks as they might get damaged.
Another one was the Braun foil razor that compiles blades under cassette. Braun razor cleaning is different from the rest of its competitors. Just pull off the cassette and rinse both the inner-outer parts underwater.
We’d advise you to frequently rinse the Braun cassette to avoid lodging the dirt, hair, and cream in the intricate parts of it.
In the case of Braun rotary razors, snap off the shaver head and rinse them. It is the same with all the rotary razors as the heads are easy to open with just a press of the button.
Step 5: Let it Dry
Now that you have rinsed and washed every part of your electric razor properly, it’s time to let them dry. Use a small paper towel or cloth to completely wipe off the parts. It is only possible with water-proof electric shavers.
For dry units, you clean and re-assemble them back to the original form.
Coming back to the drying part, allow the rotary blades, foils, and shaver heads to dry before reassembling them back to their original form. Failing to do so will offer a damp shaving experience, which you might not like if you are a dry shaver enthusiast.
Tip: Do not cover the shaver head with a protective cap unless it is completely dry.
Also, your electric shaver might smell stinky if you continue storing them wet. That’s all with the cleaning part. For your reference and quick overview, we have added a video tutorial:
Step 6: Reassembling Your Electric Razor
After drying every single part of your electric razor, it’s time to reassemble so that it is ready to use whenever you want.
For foil shavers, it is easy to reassemble all the parts as there are no major detachments. Just put the blades and foils in the position and lubricate them with cleaning spray or light machine oil. After that, turn on the shaver for a few seconds to evenly spread the lubricating agent.
For rotary shaving units, you have to be meticulous about every part as it contains cutters and combs that fit well with their matching pairs. If you mismatch the parts, then it will impact the shave quality. Of course, the razor will deliver optimal performance, but it will take more than usual time as the inner parts require time to work in the pattern.
However, it increases the chance of wearing them out quickly, so we’d advise you to put the right cutter and comb together. Also, you should know that the procedure for reassembling could be different for different rotary shavers. But the first thing you will require to remove, which is common for every rotary razor, is the retainer that holds the rotary blades.
It would not be much difficult as every shaver comes with a user manual with all instructions given in detail.
Now that you know how to clean an electric razor and get rid of unwanted hairs, dirt, debris: you must also know the right time for replacement blades for availing optimal performance.
What Is the Right Time to Change the Electric Shaver Blades?

Rotary blades or shaving foils do an amazing job, but that needs replacement at times when it loses its shaving ability. Here is the list of things that notifies you to replace the blades.
Pulling of Facial Hairs
The purpose of an electric shaver is to cut hairs, but if it starts yanking your hairs, it’s time to change the cutting block.
No Close Shaving
The feel of a newly bought shaver model is different. You don’t need to press hard against your face, nor does it require multiple passes on the same spot for the closeness of the shave. However, when these things start to happen, it is an indication that you need to replace blades as soon as possible for a better and close shave.
Overheating Cutting Mechanism
When the cutting mechanism overheats, it means that the blades or foils are excessively rubbing against each other, causing friction, wear, and tear.
As soon as you start noticing any of these things, you should quickly replace the cutting parts. Now you might think, why does this happen?
Several things contribute to such scenario:
- Frequency of shaving
- Coarse beard hair
- Wrong Shaving technique
- Low-maintenance of electric shaver
- Cheap quality of the cutting mechanism
The company advises replacing the blades or foils of electric shaver every 1 or 2 years. And we advise you to buy the replacement parts only from the manufacturers. Also, you must have a habit of regularly inspecting your blades and foils to spot out any wear or tear.
For your information, the cutting parts are a bit expensive if you buy from the manufacturers but are worth every penny. Replacement blades would be a worthy idea if you already have a luxurious electric shaver.
Contrary to this, if you are using a mid-range or budget electric shaver, we would suggest you buy a new one instead of spending on parts. It would be an affordable deal.
Assuming that you are convinced with the article and precise information: let’s answer a few commonly asked questions.
FAQs:
1. How to clean Philips Norelco electric shaver?
You must turn on the razor and rinse them under warm tap water after every shave. Now turn-off, open the hair chamber, and rinse it under the water. Also, rinse the shaving head holder under tap water. Lastly, shake off excess water and let it air-dry for a couple of hours.
2. How do you clean the inside of an electric shaver?
If you want to remove the hair and cream buildup formed inside the razor, then submerge your razor blades cartridge under water to soften that debris and then shake it to remove everything out of the cartridge. Again rinse them under running water so that it thoroughly cleans.
3. How often should you clean your electric shaver?
Before lubricating, you must check that the rotary or foil shaver is dry. Then, spray oil or lubrication on the blades and foils, holding the can 3 inches away from the parts. For evenly distributing oil, turn on the shaver for a few seconds and then turn it off.
4. How to lubricate the electric shaver?
Before lubricating, you must check that the rotary or foil shaver is dry. Then, spray oil or lubrication on the blades and foils, holding the can 3 inches away from the parts. For evenly distributing oil, turn on the shaver for a few seconds and then turn it off.
5. Does an electric razor give a clean shave?
An electric shaving unit does provide a close shave but not as close as the cartridge models offer. While if we only look at the electric shaving tools’ point of view, then more than 70% of users prefer foil over rotary models for a clean shave.
6. Why does my electric shaver smell?
It might be due to mold and mildew developing in the blades or somewhere inside your shaving unit. It happens because you might have missed it letting air-dry, and there could be some water drops inside the unit.
7. What kind of oil do you use for an electric shaver?
Light mineral oil works best in the lubricating shaver unit. Also, a spray of sewing machine oil will bring a world of difference.
Conclusion
So you have seen how easy and straightforward it is to clean an electric razor. It is important to dedicate yourself to electric shaver maintenance because the more it is clean, the better it performs.
Apart from cleaning, you must not forget to lubricate the unit. It will make the shaving operation smoother and better. Considering the cleaning part, do not use soap as it removes traces of the lubricant, pressurizing blades to heat and wear.
With this, we end our article and hope it finds you well. If you have any thoughts, feedback, or suggestions, then you can share them in our mail.